Clay tiles offer timeless beauty, exceptional durability, and superior weather resistance for roofing projects. Known for lasting 50 to 100 years or more, they provide a warm, natural aesthetic in earthy tones that complements various architectural styles.
Their thermal insulating properties help regulate indoor temperatures, reducing energy costs year-round. Clay tiles resist fire, rot, insects, and extreme conditions like heat, rain, and wind.
While heavier than alternatives, proper installation ensures structural integrity and low maintenance. This guide details preparation, step-by-step process, costs, common issues, and tips for a flawless clay tile roof.
Key Tools and Materials Needed
Tiling a roof with clay tiles requires specific tools and materials for safety and precision. Essential tools include a tile cutter or wet saw for clean edges, chalk line and level for alignment, roofing hammer or nailer, and safety gear like harnesses and ladders.
Materials encompass corrosion-resistant nails penetrating 1/2 inch into decking, synthetic underlayment or #30 felt, ice and water shield, wooden battens (1×2 or 1×3), drip edge, step flashing, ridge/hip tiles, and sealant. Stock 10-15% extra tiles for waste.
Quality supplies ensure durability; always match to tile specs and local codes. Proper preparation avoids delays and enhances results.
Why Choose Clay Tiles?
Clay tiles stand out for their blend of aesthetics, strength, and practicality. They deliver a handmade, authentic look with colors like reds, browns, and beiges that age gracefully without fading quickly.
Ideal for traditional or modern homes, they enhance curb appeal while handling harsh climates. Durability allows them to outlast asphalt shingles or wood shakes significantly.
Energy efficiency comes from heat reflection and air circulation beneath curved profiles, keeping homes cooler in summer and warmer in winter.
Low maintenance means occasional inspections suffice, saving long-term costs. Fire resistance adds safety, making them perfect for wildfire-prone areas.
Timeless Aesthetic Appeal
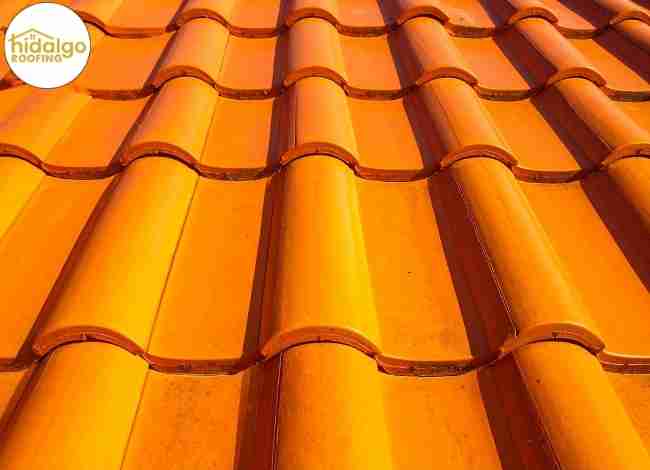
Clay tiles deliver stylish, natural warmth unmatched by synthetics. Earthy hues like reds, browns, and beiges blend seamlessly with diverse designs, from Mediterranean to modern. They maintain vibrancy for decades without quick fading.
Superior Durability
Properly installed, clay tiles endure 50-100 years against extreme heat, heavy moisture, high winds, and fire. They resist warping, rotting, and pests, outlasting asphalt shingles significantly.
Energy Efficiency Benefits
Thermal insulation and curved profiles enable airflow, reflecting heat in summer and retaining warmth in winter. This reduces utility bills year-round through natural regulation.
Preparing for Installation
Preparation ensures a stable foundation for heavy clay tiles, which weigh 8-10 pounds per square foot.
- Assess roof structure for load-bearing capacity; reinforce if needed via engineering consultation.
- Confirm minimum roof pitch of 2.5:12 for drainage; steeper slopes enhance performance.
- Select tile profiles like S, flat, or barrel based on style and climate.
- Gather tools: tile cutter, hammer, chalk line, safety harness, corrosion-resistant nails.
- Obtain permits and verify local codes for compliance.
- Order 10-15% extra tiles for cuts and breakage.
Stock underlayment, battens, flashing, and ice-water shield. Professional evaluation prevents sagging or failure.
Step-by-Step Installation Process
Installing clay tiles demands precision, starting from eaves upward. Remove old materials fully, exposing the deck for inspection and repairs against rot or weakness.
Lay synthetic underlayment or #30 felt, overlapping 4-6 inches, secured every 6-12 inches. Add ice-water shield in valleys and eaves, plus drip edge flashing.
Install 1×2 or 1×3 battens at manufacturer-specified gauge (12-14 inches typically), ensuring level alignment for airflow and drainage.
Begin with starter tiles nailed securely, then overlap field tiles by 3 inches minimum, fastening two per tile through pre-drilled holes or clips. Cut tiles precisely around penetrations using wet saws; integrate step flashing. Finish ridges and hips with sealed cap tiles.
Benefits of Professional Installation
Hiring experts ensures safety, leak prevention, and warranty validity. Professionals verify structural support, apply high-quality waterproofing, and align tiles perfectly to avoid gaps.
They use specialized tools, minimizing breakage and project delays. Time efficiency reduces disruption, while code compliance avoids fines.
Long-term, pros cut repair costs through precise overlapping and flashing. DIY risks include misalignment, water damage, and voided manufacturer warranties up to 50 years. Certified installers provide peace of mind and optimal performance.
Common Problems and Solutions
Clay tile roofs, though robust, face issues like cracks from impacts, moss in shaded areas, slippage from wind, or underlayment wear after 20-30 years. Prompt fixes maintain integrity.
Cracked Tiles
Clay tiles can crack from hail, falling branches, or foot traffic, allowing water seepage that leads to leaks and deck damage.
Promptly replace damaged tiles by carefully removing them without disturbing neighbors, then secure matching replacements. Always inspect after severe storms for hidden cracks to prevent escalation.
Moss Growth
In shaded, damp areas, moss and algae trap moisture on clay tiles, making surfaces slippery and accelerating underlayment wear. Remove growth using low-pressure washing with biodegradable cleaners.
Install zinc or copper strips along ridges; rainwater activates their natural inhibitors, preventing recurrence effectively and safely.
Tile Slippage
Improper fastening, degraded battens, or high winds cause tiles to slip, exposing underlayment and risking leaks. Professionals reposition displaced tiles, refasten with sturdy clips or nails, and replace worn battens. Regular inspections detect early movement, ensuring stability and avoiding structural damage.
Underlayment Failure
After 20-30 years, underlayment deteriorates despite durable tiles, causing leaks. Solution: lift and stack intact tiles, install fresh waterproof layers, then reinstall originals. This cost-effective approach restores protection without full replacement, extending roof life significantly.
Cost Considerations
Initial costs reflect quality and scope, but longevity offsets expenses. Factors include roof size, tile type, pitch complexity, and labor.
| Factor | Cost per Sq Ft | Notes |
|---|---|---|
| Materials | $10-$20 | Clay tiles, underlayment, flashing |
| Installation | $5-$15 | Professional labor; varies by region |
| Total Average | $15-$35 | $15,000-$40,000 for standard home |
| Maintenance | Low ($1,500-$3,000 lifetime) | Inspections beat frequent repairs |
Savings arise from energy efficiency and minimal upkeep.
FAQs
How long does a clay tile roof last?
Properly installed clay tile roofs endure 50-100 years or more with minimal maintenance. Their natural composition resists fire, rot, insects, and extreme weather like heat, rain, and wind.
Regular inspections ensure longevity, outlasting asphalt shingles by decades while maintaining structural integrity and aesthetic appeal.
Are clay tiles suitable for all climates?
Clay tiles excel in hot, rainy, and windy conditions, offering superior thermal insulation and water resistance. However, they become brittle in extreme cold, risking cracks during installation or storms. Opt for impact-resistant variants in hail-prone areas to enhance durability across diverse climates effectively.
How much maintenance is needed?
Clay tile roofs require biannual inspections for cracks or debris, plus gentle cleaning every 3-5 years using low-pressure washing. Remove leaves and moss promptly to prevent moisture buildup. Avoid walking on tiles; zinc strips deter algae naturally, keeping upkeep low over the roof’s long lifespan.
Can I install clay tiles myself?
DIY clay tile installation is not recommended due to their heavy weight (8-10 lbs per sq ft), requiring structural reinforcement, and precision for overlaps, flashing, and battens. Heights pose fall risks, and errors lead to leaks or voided warranties. Professionals ensure safety, code compliance, and optimal performance.
Final Thoughts
Tiling a roof with clay tiles invests in enduring protection, beauty, and efficiency. Follow structural checks, precise steps, and pro help for leak-proof results lasting generations.
Regular maintenance like inspections preserves performance against weather. Weigh upfront costs against decades of savings and value addition. With careful planning, your clay tile roof enhances home appeal while standing resilient. Consult experts for tailored success.